You are currently browsing the tag archive for the ‘Baking’ tag.

I’ve been so busy lately that I haven’t even had time to get my usual winter blahs. Maybe they’re still coming, but I don’t know. I don’t know much of anything anymore, not having any time to stop and think.
But there. Complaining over. After all, I’m at home today on a beautiful sunny afternoon, trying to enjoy sitting around. One of the side effects I’ve noticed of being super-busy is monkey mind. It’s a Buddhist term that I learned from reading Nathalie Goldberg, who used it to talk about that restlessness of mind that makes it difficult to slow down, concentrate, and write. Well, in case you can’t tell by the previous awkward sentences, I am having difficulty with that writing part. But beyond that I’ve gotten so used to running around that I’m having a hard time staying put at home and just appreciating my leisure time. I keep looking around for something to clean, something to panic about, something to put on my to-do list. When I find something, I do it halfway and then get distracted by another thing that I really should be doing instead.
I thought I’d pin myself down at home for a while by focusing on monkey bread. This is a long overdue recipe preparation, as it’s from a blog I was paired with a long time ago for a taste & create event: The Vegetarian Hausfrau. She writes twice a week from Germany, and her site offers many wonderful, healthful recipes, so of course when I was browsing through it, I got fixated on something unhealthy. Monkey bread has sweet dough, slathered in butter and heavily layered with sugar and cinnamon. Just what I need to calm (or, um, sedate) my monkey mind.
This is a lovely old-fashioned recipe that’s easy to assemble. The only time-consuming part is the rolling of little dough balls, which must then be dunked in melted butter then coated in a sugar/cinnamon mixture. It’s like mini cinnamon rolls when it’s baked. And it’s so good that my monkey hands couldn’t resist pulling pieces out to put in my monkey mouth before I even finished photographing. Take that, monkey mind! Thanks to The Vegetarian Hausfrau for a great recipe!

One of my talents (if you can call it that) is my ability to synthesize. I notice things here and there, collect ideas all over the place, and then they marinate in my brain until two or three things connect and suddenly I have a new idea, argument, thought, or, in the case of the kitchen, recipe. Now, you can call this stealing, if you like. I prefer to think of it as borrowing, or on those days where I’m really full of myself, a really derivative form of genius. Okay, I’ll be the first to admit it, I’m not the most original thinker in the world.
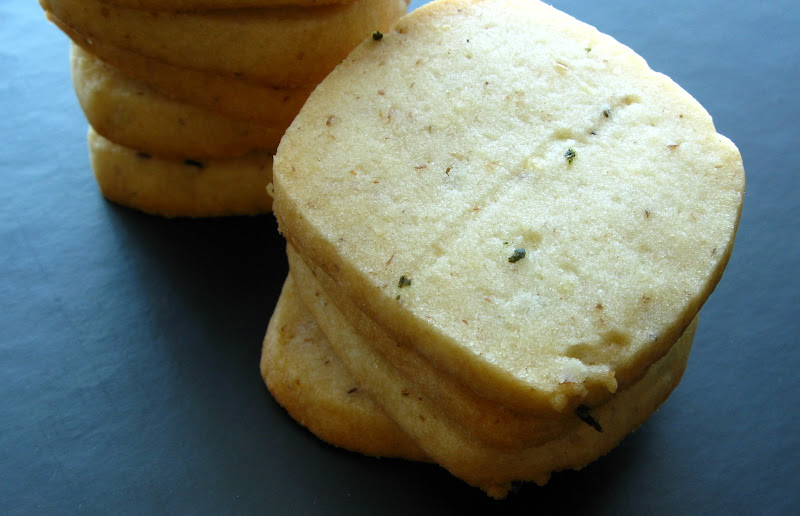
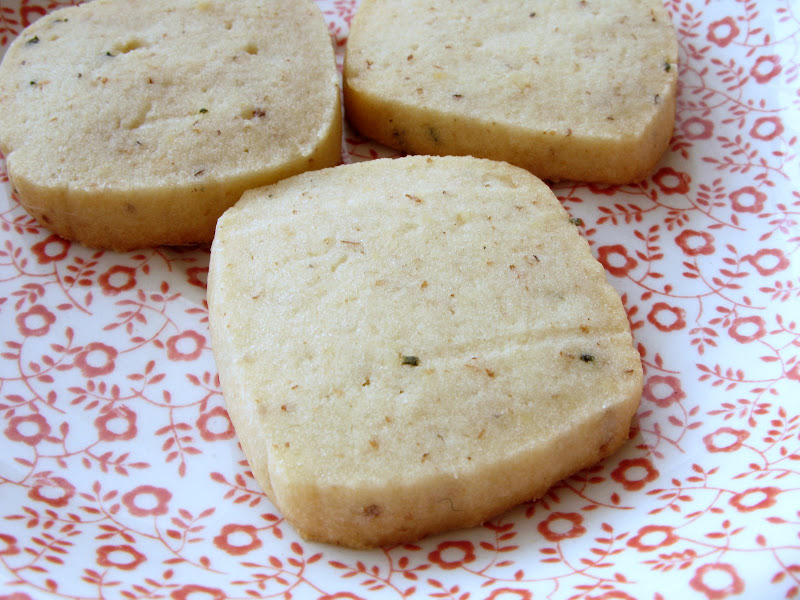
Anyway. That idea-marinating is the source of these crispy, buttery, not-too-sweet, slightly herbal little cookies. I recently spotted a recipe for rosemary cookies at ellenfork. This idea popped into my mind when I was contemplating our indoor rosemary bush, which I’m trying to take advantage of now, before it dies (every year we try to winter our rosemary indoors, and every year it makes it to January before dying. I’m hoping for a change this year, but I’m not too hopeful). So, that’s the first bit.
As I contemplated rosemary cookies, I remembered a Laurie Colwin recipe for rosemary toasted walnuts that I made (and Carlo loved) last year. When I was thinking about those walnuts, I remembered that Tim at Lottie + Doof recently posted a rosemary cashew recipe. Thinking about Tim reminded me of another recipe he posted recently, for walnut sandwich cookies. Thus: rosemary–>cookies–>nuts–>walnut cookies–>rosemary walnut cookies. A perfect recipe for cookies that, though they might be a bit derivative, are super- pleasant. Call me a genius, or call me a slightly boring thief. It’s up to you. Either way, I do suggest you try these. They’d make a lovely accompaniment to tea, or a nice simple addition to a holiday cookie platter.
Rosemary Walnut Butter Cookies
Adapted from “The Sweet Life” by Kate Zuckerman
1 cup walnuts
1 tablespoon chopped fresh rosemary (to taste, or use 1 tsp. dried, crushed rosemary)
2 1/2 cups flour
1/2 teaspoon salt
16 tablespoons butter, at room temperature
3/4 cup sugar
1 egg, at room temperature
1. Combine the walnuts, rosemary, and 1 tablespoon of flour in the bowl of a food processor, and grind until the walnuts are a fine powder.
2. Combine the rest of the flour (2 1/2 cups minus 1 Tbsp), the salt, and the walnut powder in a small bowl. Set the bowl aside.
3. Cream the butter at medium speed with a paddle attachment in the bowl of a stand mixer. You can do this by hand as well, if you use some elbow grease. Add the sugar and continue beating until the mixture is light and fluffy. Next, beat in the egg, mixing until the batter is smooth.
4. Add the dry ingredients to the wet, folding them together with a spatula. Mix slowly in the stand mixer or stir with a wooden spoon until ingredients are combined.
5. Scrape cookie dough into a piece of plastic wrap, wrapping it tightly and then pressing it into a 1-inch-thich rectangle. Refrigerate for at least two hours or overnight.
6. When you’re ready to bake, line baking sheets with parchment paper and preheat the oven to 350 F. Slice the chilled logs of dough into 1/8-1/4 inch thick squares and arrange them about a half inch apart on cookie sheets.
7. Bake until the cookies smell toasty and they’re golden on the bottom, about 12 to 15 minutes. Allow the cookies to cool on the sheets. These cookies store well in an airtight container, and I have a feeling they’d freeze beautifully too.

This month, the Daring Bakers took on a super-caramel cake, a recipe from Shuna Fish Lydon.that was originally published on Bay Area Bites.
I say super-caramel, because it really was. Caramel cake, caramel icing, and in my case, caramel drizzle. This cake was moist, and I think probably in my case, too dense. I’m not a cake-lover or a cake baker, and it seems that more often than not, my cakes are heavy. Why? I don’t know. I guess because I don’t adore cakes, I’m not putting the love into them that they deserve. They fall flat out of resentment. I did, however, adore the icing. With browned butter and dark caramel and a pinch of salt, the icing was rich, sweet and delicious. If it weren’t totally inappropriate, I could eat this icing straight out of a bowl. Of course, then I’d probably end up very, very sick.
This wasn’t my first time making caramel, so I didn’t have any problems with it, though I’ve ruined many a caramel to get to this point. What I love most about making it is the suspense– standing over the pot watching the sugar syrup boil in thick bubbles that look like alien eyeballs, and worrying as it gets darker and darker that I’ll wait too long, just a second too long, and I’ll end up with burnt muck instead of dark, rich, bittersweet syrup. I feel so accomplished when I don’t ruin it. I love any opportunity to make a caramel!
So, that’s my caramel cake report. The cake itself was nice but I probably won’t make it again. The icing… that I can’t wait to recreate. Maybe on top of carrot cake next time!
Thanks to Dolores at Chronicles of Culinary Curiousity and her co-hosts Alex of Blondie and Brownie, Jenny of Foray into Food and gluten-free adapter Natalie of Gluten-a-Go-Go for a fun caramel-laden challenge. For the recipe, please see the above Bay Area Bites link. And if you want more caramel cake (I know you do!), check out the Daring Bakers Blogroll!


There’s nothing like a blogging event to keep a food blogger on her toes. While I’m not a huge joiner-of-things, I love the idea of Taste & Create, an activity that pairs food bloggers up to browse through each other’s archives and choose a delicious recipe to recreate.
I was paired with The Life and Loves of Grumpy’s Honeybunch, a blog I’ve come across before. Its tagline, “who I love, what I love, and what I love to” explains the proprietress HoneyB’s mindset perfectly. I loved browsing the recipes on this charming site, but I also enjoyed that it’s clear in every post why she cooks. It’s for “who she loves,” and the blog is full of mentions of and reflections about friends and family. It’s all very homey and comforting.
I picked out a recent recipe that caught my eye mostly because of its use of cardamom (my current obsession). On the other hand, I was a little unsure because of the sesame seeds. I’m not a huge sesame lover, because I find it has a musty kind of taste to it. This recipe worked well because the nutty rich flavour of the sesame, while present, wasn’t dominant. I also loved the warm cardamom scent of the cookies, but I would add more next time (or grind it fresh instead of using my tired old ground cardamom), because I thought there wasn’t enough for my taste (mind you, I’m a cardamom fiend). My favourite thing about the cookie is its texture. They’re chewy at the middle, but crunchy and crisp at their edges.
Finally, as these cookies are iced, they are very sweet. HoneyB mentioned the same thing. Next time I make them I might not make the icing, though as I flavoured that with cardamom too, it will hurt me a bit to leave it off. You can find the recipe here. The changes I made were: demerara sugar instead of regular brown sugar, cardamom instead of cinnamon in the icing, and bake time (this was by accident, as I forgot about them, but I baked them for about 15-18 minutes and they turned out great).
Thanks, HoneyB, for a great recipe and a glimpse into your life!

Carlo’s usually the video poster, but I thought this was a funny postscript to our cheese-making post. I found it while browsing around looking for cheddar recipes (so I can make cheese curds, so I can make poutine). This is definitely NOT how cheese is made. Carlo and I are big fans of these guys, Mitchell and Webb, star in a hilarious (vulgar) sitcom called Peep Show and this sketch comedy show (WARNING: some NSFW language).
After watching the above video this morning, I was browsing my feed reader and found this lemon and fresh cranberry scone recipe at Smitten Kitchen. That got me out of bed (yes, I browse in bed) and into the kitchen. I didn’t have a lemon in the fruit bowl (especially not my favourite meyer lemon, which Deb recommends–we obviously need to plan a trip to LA so we can raid my uncle and aunt’s tree), so I made lime-cranberry scones. I think the lack of lemon was a convenient circumstance, because I loved the slightly flowery lime aroma. The scones themselves were perfect, crisp at their edges and tender, almost meltingly so, at their heart. With or without cranberries (go with!), this is an excellent base recipe. Check out the above link to Smitten Kitchen to try it out yourself.


Oh, the puns, the puns. I was telling Carlo yesterday, I don’t know if my pun-brain is a blessing or a curse. Probably both– a blessing for me, because it always makes me feel clever, and a curse for everyone who is subjected to it, because, really, they have to hear the pun and then smile politely through gritted teeth.
As if monthly Daring Bakers creations weren’t enough, I’ve recently set myself a new personal challenge. For the last few months, the DB challenges have focused on one of my most-beloved and most-neglected cookbooks– Peter Reinhart’s The Bread Bakers Apprentice. It was a reminder and a great jump-start for an idea I’ve been kneading around for a while (see what I did there? Kneading develops the dough, I’m developing an idea. I’m clearly a brilliant wordsmith).
See, I love baking. There’s something about being wrist-deep in dough, and the careful steps along the way that’s so satisfying. There’s very little in the world that I enjoy more than sawing into a loaf of bread that I. Made. Myself. I love the patience it requires, and the skill, and I love the way that every time I bake a loaf of bread I learn something new. I love kneading dough until it comes together into a silky mass, I love the smooth belly of risen dough before I punch it down for shaping. I love bread.
I’m a decent, but not superb, bread baker, and I know that I’ve got a lot to learn about the chemistry and formulas and proportions of bread if I want to improve. I’ve long been fascinated and intimidated by Reinhart’s book. What I love is how informational the text is, how much I’ve learned already just by paging through the book. But now I’ve decided it’s time to get a little more serious. So I’ve decided to bake my way through the book. This is not a side-project, I’m not starting a new blog, it’ll just be a bit of reporting now and again on my attempts and (I hope) successes. Obviously since I’m cooking through the whole book I won’t be posting recipes (feel free to search for them elsewhere online. I know some are out there. The book is a great investment though), but I hope to talk about what worked for me, what didn’t work, and what I learned about bread-baking technique.
I suppose that technically I’ve already started this project with my Daring Bakers pizza, so I won’t call this an inaugural post. Over the weekend, I made ciabatta. I suppose I should have chosen cinnamon rolls, or remade lavash crackers (which I MADE but then didn’t post for the DB challenge date… oops), but I recently had some incredible ciabatta from a great local bakery, and I couldn’t get it out of my head. Plus, we were having a dinner party and I wanted to make something so impressive, so beautiful and tasty, that Carlo’s family (our guests) would tell Carlo he should marry me all over again. So, ciabatta.
This bread required a pre-ferment, and I had the choice between a biga and a poolish. I chose the poolish, for no really good reason, except that it came first in the book. It’s a really easy-to-make sponge of just flour, yeast, and water, that I left out on the countertop for 4 hours to develop (it got all bubbly–see the photo below) before I popped it into the fridge overnight.

The next day I combined my poolish with flour, water and more yeast before the kneading process, which is one I’ve never used before. Because the dough was so wet, I couldn’t turn it out onto the counter to work with it. Instead, I left it in the bowl and used my hand like a dough hook, rotating the bowl with my other hand.
Yes, I could have used my stand mixer, and maybe it would even have turned out better. Hands-off work requires less flour addition, after all. And from what I understand, the reason I didn’t have nice big holes in my finished bread is because the dough wasn’t wet enough. But, like I said above, I love being wrist-deep in dough, so I went the hands-on route. I will try the stand mixer next time*.

The ciabatta baked into lovely loaves, helped along a bit by a super-preheated oven (baking stone in, oven preheated at 500 F for 45 minutes), and a little bit of spritzing in the early stages: put bread in, close oven door. Open oven door and spray walls of oven (I followed Reinhart’s suggestion and covered the glass of the door with a towel, just in case of errant sprays). Close oven door for 30 seconds, then spray again. Repeat once more.
As you can see by the picture at the top of the page, the bread baked up beautiful and golden. It had fantastic flavour, and while Carlo’s family didn’t start planning our second wedding, they all loved it, and two and a half loaves (they were small, granted) disappeared into 6 peoples mouths.
*ahem… I’ve got loaves in the oven as I write, made with the stand mixer. I’ll post an update if they work out differently from the ones I’ve already made.
Well… not so daring pizza. Putting tomatoes, cheese and oregano on top of a crust and stopping there does not equal adventurous. But I did throw my pizza dough in the air, and I figure that’s daring enough. Please excuse the blurry photo. We did our pizza in the evening, and it’s getting dark SO early now. The winter darkness is coming!

As anyone who reads food blogs knows by now, this month’s Daring Bakers challenge, which was hosted by Rosa at Rosa’s Yummy Yums, was pizza dough, a recipe that required two days of waiting and nearly no work, except for the exciting part where I threw pizza dough all around the kitchen. Highlights include: dropping dough on the ground, and finally figuring out how to toss pizza without throwing it on the ground, and being happy that my kitchen floor is clean (yes, we ate it anyway). Oh, and a home-made evening. With our pizza, we drank beer that Carlo and my dad made (post from Carlo soon, I hope). ON our pizza we had oregano we grew ourselves this summer, oil-packed sun-dried tomatoes made by a (very excellent, obviously) friend, and…. home made mozzarella! Yes, we made cheese. It was the highlight of the cooking course we just finished. More on this very, very soon, as my camera is heavy-laden with cheese photos. The dough was a Peter Reinhart recipe, and I was very impressed. It was soft and very easy to work with (except for its tendency to fly around the kitchen while I was tossing it, which, in fairness, I can’t blame on the dough), with fantastic flavour. The final product managed to be tender and crispy at the same time, and very, tantalizingly, wonderfully thin.

We used this sauce: Sun-Dried Tomato Sauce 1 28-oz. can of diced tomatoes, drained 6 oil-packed sundried tomatoes, (use more or less to your taste) 3-4 cloves of roasted garlic (click link for garlic-roasting technique) salt to taste Place all ingredients in the bowl of a food processor, pulse them a few times, taste and adjust seasoning to taste. That’s it! Here’s the dough recipe: Basic Pizza Dough 6 Pizza crusts (about 9-12 inches/23-30 cm in diameter). 608 g Unbleached high-gluten (%14) bread flour or all purpose flour, chilled 1 3/4 Tsp Salt 1 Tsp Instant yeast 60 g Olive oil or vegetable oil 420 g Water, ice cold (40° F/4.5° C) 1 Tb sugar Semolina/durum flour or cornmeal for dusting As we are just two, I reduced the recipe as follows: makes 1 big or 2 pizza crusts 250 g flour 5 g salt 1 tsp gluten 1/4 tsp instant yeast 1 tb olive oil 140 g water, ice cold 1 tsp sugar DAY ONE Method: 1. Mix together the flour, salt and instant yeast in a big bowl (or in the bowl of your stand mixer). 2. Add the oil, sugar and cold water and mix well (with the help of a large wooden spoon or with the paddle attachment, on low speed) in order to form a sticky ball of dough. On a clean surface, knead for about 5-7 minutes, until the dough is smooth and the ingredients are homogeneously distributed. If it is too wet, add a little flour (not too much, though) and if it is too dry add 1 or 2 teaspoons extra water. NOTE: If you are using an electric mixer, switch to the dough hook and mix on medium speed for the same amount of time.The dough should clear the sides of the bowl but stick to the bottom of the bowl. If the dough is too wet, sprinkle in a little more flour, so that it clears the sides. If, on the contrary, it clears the bottom of the bowl, dribble in a teaspoon or two of cold water. The finished dough should be springy, elastic, and sticky, not just tacky, and register 50°-55° F/10°-13° C. 3. Flour a work surface or counter. Line a jelly pan with baking paper/parchment. Lightly oil the paper. 4. With the help of a metal or plastic dough scraper, cut the dough into 6 equal pieces (or larger if you want to make larger pizzas). NOTE: To avoid the dough from sticking to the scraper, dip the scraper into water between cuts. 5. Sprinkle some flour over the dough. Make sure your hands are dry and then flour them. Gently round each piece into a ball. NOTE: If the dough sticks to your hands, then dip your hands into the flour again. 6. Transfer the dough balls to the lined jelly pan and mist them generously with spray oil. Slip the pan into plastic bag or enclose in plastic food wrap. 7. Put the pan into the refrigerator and let the dough rest overnight or for up to thee days. NOTE: You can store the dough balls in a zippered freezer bag if you want to save some of the dough for any future baking. In that case, pour some oil(a few tablespooons only) in a medium bowl and dip each dough ball into the oil, so that it is completely covered in oil. Then put each ball into a separate bag. Store the bags in the freezer for no longer than 3 months. The day before you plan to make pizza, remember to transfer the dough balls from the freezer to the refrigerator. DAY TWO 8. On the day you plan to eat pizza, exactly 2 hours before you make it, remove the desired number of dough balls from the refrigerator. Dust the counter with flour and spray lightly with oil. Place the dough balls on a floured surface and sprinkle them with flour. Dust your hands with flour and delicately press the dough into disks about 1/2 inch/1.3 cm thick and 5 inches/12.7 cm in diameter. Sprinkle with flour and mist with oil. Loosely cover the dough rounds with plastic wrap and then allow to rest for 2 hours. 9. At least 45 minutes before making the pizza, place a baking stone on the lower third of the oven. Preheat the oven as hot as possible (500° F/260° C). NOTE: If you do not have a baking stone, then use the back of a jelly pan. Do not preheat the pan. 10. Generously sprinkle the back of a jelly pan with semolina/durum flour or cornmeal. Flour your hands (palms, backs and knuckles). Take 1 piece of dough by lifting it with a pastry scraper. Lay the dough across your fists in a very delicate way and carefully stretch it by bouncing it in a circular motion on your hands, and by giving it a little stretch with each bounce. Once the dough has expanded outward, move to a full toss. NOTE: Make only one pizza at a time. During the tossing process, if the dough tends to stick to your hands, lay it down on the floured counter and reflour your hands, then continue the tossing and shaping. In case you would be having trouble tossing the dough or if the dough never wants to expand and always springs back, let it rest for approximately 5-20 minutes in order for the gluten to relax fully,then try again. You can also resort to using a rolling pin, although it isn’t as effective as the toss method. 11. When the dough has the shape you want (about 9-12 inches/23-30cm in diameter – for a 6 ounces/180g piece of dough), place it on the back of the jelly pan, making sure there is enough semolina/durum flour or cornmeal to allow it to slide and not stick to the pan. 12. Lightly top it with sweet or savory toppings of your choice. NOTE: Remember that the best pizzas are topped not too generously. No more than 3 or 4 toppings (including sauce and cheese) are sufficient. 13. Slide the garnished pizza onto the stone in the oven or bake directly on the jelly pan. Close the door and bake for abour 5-8 minutes. NOTE: After 2 minutes baking, take a peek. For an even baking, rotate 180°. If the top gets done before the bottom, you will need to move the stone or jelly pane to a lower shelf before the next round. On the contrary, if the bottom crisps before the cheese caramelizes, then you will need to raise the stone or jelly. 14. Take the pizza out of the oven and transfer it to a cutting board or your plate. In order to allow the cheese to set a little, wait 3-5 minutes before slicing or serving.
Yes, you read that title right. Don’t be alarmed. Just look at this:
 |
| From Coronation Grape Cake |
How can that gorgeousness not be good?
This cake came about because of an impulse purchase. I spotted dusky purple grapes at the market and couldn’t resist. If you’ve wondered all your life why grape candy doesn’t taste like grapes, wonder no more–it’s modeled after grapes like these. In Canada, we have coronation grapes, which are similar to concord. They have deep purple flavour, and are much less sweet than a green or red table grape. While I know these aren’t wine grapes, they’re the first grapes I’ve ever tasted that made a grape-wine flavour connection for me. So there you go! Grapes, real, grapey grapes.
But what do you do with a grape like this? Well, I’ve got plans for sorbet, but my first thought, maybe because the grapes remind me a bit of blueberries, was cake.
This recipe is adapted from a Patricia Wells recipe, and I highly recommend it. The grapes are tart and flavourful, and I substituted some ground almonds for the flour, which gave a rich nuttiness that’s fantastic. The recipe also calls for olive oil. I’m not sure exactly what this adds to the flavour, not having tasted this cake with butter, but it makes for a great texture. This is the kind of cake I love, a dense, rustic treat that you can serve as dessert, or slice for a decadent breakfast. Plus, you get to say “would you like some grape cake?,” which at least gets people’s attention.
 |
| From Coronation Grape Cake |
GRAPE CAKE
2 large eggs
2/3 cups sugar (use less if your grapes are on the sweet side–mine were quite tart), plus extra for finishing the cake
4 Tbsp melted butter
1/4 cup extra-virgin olive oil
1/3 cup milk
1/2 tsp vanilla extract
1 cup all-purpose flour
1/2 cup ground almonds (feel free to substitute flour here if you don’t have almonds, or even scale back the flour a bit and add more almond flour)
3/4 tsp baking power
a pinch of salt
zest of one lemon
2 cups flavourful grapes
Equipment: a 9″ round cake pan
Butter and flour a cake pan, then set it aside. Preheat your oven to 350 F.
Beat the eggs and sugar in a large bowl with an electric mixer until they’re thick, about 3 minutes. Beat in milk, butter, oil, and vanilla.
Sift together the flour, almonds, baking powder and salt. Add the zest, tossing it to make sure it is well-distributed. Then stir the flour mixture into the wet ingredients, making sure it is well-combined. Allow this mixture to sit for 10 minutes to make sure the flour has absorbed the liquids.
Gently stir in 1 1/2 cups of grapes, then transfer the batter to your cake pan.
Bake on the middle rack for 15 minutes. After 15 minutes, pull out your cake and top it with the reserved grapes. Sprinkle coarse granulated sugar overtop. Bake for about 40 more minutes, until the top of the cake is golden and springy. Remove from the oven and allow to cool in the pan.
Something else to do with grapes: check out this beautiful tart at Lottie + Doof
Hi.
I only come by here now to say hi, apologize, then post a Daring Bakers challenge. I hope this will change soon, as soon as we move into our new! apartment!, but for now, I’d like to say hi, sorry, and tell you that eclairs are delicious, fun, and (mostly) easy to make. And yes, this is a Daring Bakers challenge.

Eclairs are easy, if you follow instructions and proportions, and if you don’t get greedy. I offered to make these as a dessert for a dinner my in-laws were hosting. The recipe claims to make 20 eclairs, and I thought “pssh… who wants puny little 20-to-a-recipe pastries? I’m going to make REAL sized ones.” This was a mistake. My first batch of choux pastry went horribly, horribly wrong, coming out like lumpy oblong pancakes. I worried and complained and generally acted miserable. My mother-in-law and auntie-in-law tutted and pooh-poohed, and said, “don’t worry, you’ll cut them and put cream in them and top them and they’ll be gorgeous.” And I allowed myself to be soothed, but the psychological weight was too much. Inferior! Eclairs! To guests! I couldn’t take it, so I marched back to the kitchen and started my pastry from scratch, thus inconveniencing the other cooks and guests, and hogging the oven, which needed to be used for important things, like, you know, dinner. Some house guest I am. But the eclairs did turn out.
The pastry was tender, the pastry cream was sweet and smooth and cold, and the chocolate sauce on top was just the right balance of gooey and firm. So, yum!
I modified the recipe for chocolate pastry cream, eliminating chocolate and adding half a vanilla bean and some Jameson, trying to create an Irish cream flavour. The flavour was fantastic, but I’m not a big cornstarch fan, so I wouldn’t use this except as a filling, where it holds its shape beautifully. The chocolate sauce, while fiddly, is all stations go delicious, and I wish that I had some right now, so I could eat it on ice cream.
All in all, a great challenge, thanks to MeetaK and Tony Tahhan, both of whom you can visit to check out the recipe. Also, check out the Daring Bakers blogroll to see what those bloggers more dedicated than me have produced.

We’re still floating and mildly homeless, so I took over someone else’s kitchen (my mother’s) to perform this month’s Daring Bakers challenge. I’m glad I did! I discovered that danish pastry is time-consuming but not that tough and super-rewarding. The final result is buttery, melting, and super-tender.
I’m grateful to Kelly of Sass & Veracity and Ben of What’s Cooking? for a great challenge! I’m a little too lazy to copy out the recipe, so if you’d like to try it out (do! It’s fun and delicious!), you can find it here.

