
When I was interviewing the chef who was our instructor at the cooking course we recently took, I asked a serendipitous question– I asked him what he’s been cooking lately. When he told me he’s been experimenting with cheese, I got very enthusiastic, so he offered to show the class how to make fresh mozzarella.
I love the idea of fresh, chewy mozzarella, but I’m often disappointed. You know what I’m talking about right? Those balls that have the consistency and flavour of wet tissue paper. This homemade mozzarella is nothing like that. It melts beautifully and is slightly chewy, but it has real, lovely, milky taste. I can’t wait to try it again! I’m having slight word burnout, so I thought I’d give you a series of photos to go with the recipe instead of a lot of description or a story. It’s long, so jump in ahead! It was our first time making cheese, and while the process wasn’t too tough, I’m a little nervous about when we make it on our own. Any experienced mozzarella-makers out there have any tips? Recipe and LOTS of photos after the jump.
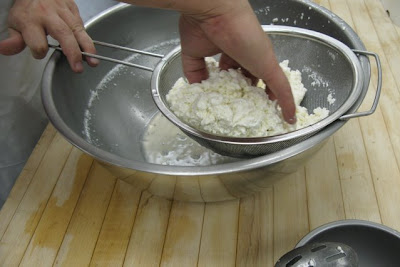
Vanity compels me to inform you that most of the hands you see in the following photos aren’t mine or Carlo’s. Our hands were busy with the camera when these photos were taken!
Fresh Mozzarella
4 litres milk (not ultra-pasteurized, and not homogenized. 2% is good)
1 1/4 cup cool water (chlorine free)
1 1/2 tsp. citric acid (you can get this at health-food stores. It’s a powder)
1/4 rennet tablet (or 1/4 tsp. liquid rennet)– Rennet is available from Danlac in Alberta, or try New England Cheesemaking. They also have great instructions,FAQs, tips and troubleshooting on the latter.
1 tsp. cheese salt (this is non-iodized salt–iodine interferes with the cheesemaking. If you can find salt with no iodine in it, this is an optional ingredient. You could add herbs as well/instead)
large steel bowl
large pot wide enough to comfortably hold your steel bowl (if you can’t get these two items to fit together, see step #4)
thermometer
colander
slotted spoon (preferably metal)
long knife (or use the handle of a metal spoon, if it’s thin)
microwaveable bowl (you don’t need this if you’re not using a microwave, but that’s the technique we learned, so…)
rubber gloves (optional. I didn’t use them, but the cheese is HOT!)
1. Fill large pot with several inches of water and put it over high heat to boil.
2. Dissolve the rennet into 1/4 cup cool water. Stir and set aside.
3. Mix citric acid into remaining 1 cup of water, and pour citric acid mixture into your bowl. Add the milk, stirring well to combine with citric acid solution.
4. Place the steel bowl over the pot and heat to 90 F, while stirring. (This is essentially creating a double-boiler effect, but if you don’t have a bowl the right size, do it right in the pot. Just be careful and monitor the temperature closely, stirring a lot.

5. When the milk reaches 90 F, remove it from the heat and slowly stir in the rennet solution, using a gentle up and down motion. Do this for about 30 seconds.

6. Cover the milk/rennet solution and don’t disturb it for 10 minutes.
7. Check your curd, stick your hand into it and gently pull up. The curd should split gently, like a soft custard, and you should be able to see a separation between curd and whey (the yellowy liquid that separates). If your curds are too soft and/or your whey too milky, let the curd set for a few more minutes.

8. Cut the curd into cube-like shapes with a knife or the narrow end of a metal spoon. We cut straight in, holding the spoon vertically, first from left to right, then from top to bottom. Then we angled the spoon sideways and cut through the curd horizontally at a couple depths to form cubes.

9. Put the cut curds back on the heat, and slowly and gently move them around while heating them to 105 F.

10. Take curds off the burner and keep stirring them for a few more minutes (longer=firmer cheese). Then pour the curds and whey through a colander to separate them (do this GENTLY, but separate as much whey as possible without pressing the curds a lot). If you want, you can store the cheese in the whey later. To do this, salt the whey well and set it aside with a few ice cubes in it to cool it down.

11. Transfer the curds to a microwaveable bowl, and put them in the microwave (on HI) for one minute. Now is when you’re going to want rubber gloves, if you’re using them.
12. Remove the bowl and drain the whey again, this time gently pulling the curds together into a single piece.
13. Microwave again for 30 seconds. Drain again. Knead the cheese together into a single mass (this is just like kneading bread), then pull it out and try stretching it. If it breaks instead of pulls, it’s not hot enough (it must be 135 F). Microwave for another 30 seconds, if necessary.

14. When the cheese is hot and stretchy, add your salts and work them in. Then begin stretching. Work it until it is smooth and shiny. Don’t go too long or it’ll get too firm.

15. Knead the cheese into a smooth shiny lump. I used the same technique as I do for forming dinner rolls, stretching the dough into a smooth belly on top by pulling it into itself at the bottom. Does that make sense?

16.To cool the cheese, drop it into ice water or the salted whey you set aside earlier. It can be stored in the fridge this way, or wrap it in plastic wrap when it’s cool. It’s ready to eat after it has cooled.


16 comments
Comments feed for this article
November 14, 2008 at 9:16 pm
Erin
That is intense! I’m not sure I would have the patience, but it sure is fascinating to view the images of your cheese-making adventures.
November 15, 2008 at 11:24 am
kickpleat
i don’t know if i could make it myself, as i hate buying ingredients with only 1 use, but this looks so good and easy! mmm, cheese.
November 15, 2008 at 1:09 pm
Jude
they make it looks so easy… It’s like little pieces of bread dough.
November 15, 2008 at 4:12 pm
hannehanne
Erin– It’s easier than all those photos make it seem! Start to finish, the process is less than 45 minutes.
kickpleat– Well, yeah, I guess it’s kind of true… but if you think of all the different types of cheese you could make, that’s kind of like more than one use, right?
Jude– The bread comparison is exactly what I thought of! It really did feel like playing with dough.
November 15, 2008 at 9:54 pm
happygrub
I am soooo impressed!
By the way, no need to ration ur tea, I’ll send some over when I replenish my stock. We plan to go the the Indonesian island Batam soon, its an hour long ferry ride away from Singapore. And the sell that tea, its like US 15 cents per box!
November 16, 2008 at 3:43 pm
This is not how cheese is made, plus lime-cranberry scones « Supper In Stereo
[…] Carlo’s usually the video poster, but I thought this was a funny postscript to our cheese-making post. I found it while browsing around looking for cheddar recipes (so I can make cheese curds, so I can […]
November 16, 2008 at 8:59 pm
Diane
Loved your recipe and pictures, I filmed Nash Cognetti from Tra Vigne, St Helena making his recipe for fresh mozzarella. It was fun to watch him make it but think you need tough fingers in that boiling water…here is a link to the video http://inyourkitchen.com/video_detail.php?id=MTI1
November 17, 2008 at 3:31 am
Just Cook It
Amazing, very impressive
November 17, 2008 at 9:41 am
Susan/Wild Yeast
Thanks so much for this tutorial! I have made mozzarella before but was never 100% satisfied with the way it turned out and I wasn’t sure what it was supposed to look like along the way. This is very helpful.
November 18, 2008 at 5:47 am
hannehanne
happygrub– You’re the best! I can’t believe that tea is so cheap, it’s delicious!
Diane– Thanks for the link. His technique is different from the one we learned, but I see the end result is similar. His mozzarella looks gorgeous!
Just cook it– Thanks! It’s not even very hard to do.
Susan– Hey, glad we can be of help. Cheesemaking is interesting, isn’t it? By the way, I love your blog.
November 18, 2008 at 5:08 pm
Y
Oh this looks like fun! Thanks for the photos and the info. I must try this some time!
July 26, 2009 at 9:37 am
Piper
Has anyone tried to infuse the milk with a flavor–basil, for example, before starting the cheesemaking process?
July 26, 2009 at 11:22 am
hannehanne
Piper, That’s a great idea! I’ve never thought of it before, but I’d love to try it. Let me know how it works if you give it a shot.
March 2, 2010 at 7:26 pm
A Canadian Foodie
Hi!
I think I am going to meet you tomorrow at the Edmonton Foodie Meet up? Are you coming? I would LOVE to have you teach me how to do this… and others may be as interested. Are you able to offer a session for me, and possibly others, on how to make this?
Thank you for considering this!
Valerie
June 24, 2010 at 7:22 am
Mini Heirloom Tomato Salad with Truffle Oil Basil Vinaigrette
[…] Good Appetite, the Kitchn, Supper in Stereo Cancel […]
August 27, 2012 at 5:50 pm
Silverstone
Gave this a shot, and when it came time to knead, the cheese was too…goopy, I suppose. As it cooled and firmed up, I resumed, but the texture was off, so I popped it back in the microwave. That did the trick! It’s very yummy…way better than store-bought. ^_^ But the cheese may need an extra round of kneading to come out properly.